Vista wallpapers

Free Vista wallpapers

Vista wallpapers

READ MORE - Vista wallpapers
Free Vista wallpapers
Vista wallpapers
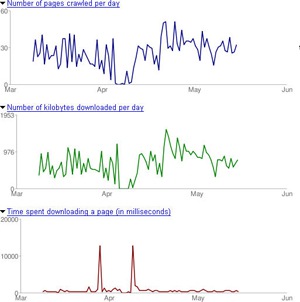
Regular and frequent visits by the crawler is the first sign that your site appeals to Google. Thus the most efficient way to get frequent and deep crawls is to develop a website that search engines see as important and valuable.
Note that you can’t force Googlebot to visit you more often – what you can do is to invite it to come. Possible measures to take to increase the crawl rate may include:

Millions of searches are conducted each day on popular search engines by people all around the world. What are they looking for? A number of major search engines provide a way to glimpse into the web's query stream to discover the most popular search keywords or topics. These are:
I have seen this question several times at different message boards, so I've decided to write an article about it. USB removable disks (also known as flash drives or "Disk on Key" and other variations) are quickly becoming an integral part of our electronic life, and now nearly everybody owns one device or another, in forms of small disks, external hard drives that come enclosed in cases, card readers, cameras, mobile phones, portable media players and more.
Portable USB flash drives are indeed very handy, but they can also be used to upload malicious code to your computer (either deliberately or by accident), or to copy confidential information from your computer and take it away. Whenever a new USB device is plugged-in to a USB port, the operating system checks the device and hardware id to determine if it's a storage device or not. If it determines that it is indeed a mass storage device it will load the appropriate driver, and will display the device as a drive in the Windows Explorer tree view. This is done by using the usbstor.sys driver. If the device does not have a drive letter, you will need to assign one to it by using the Disk Management snap-in found in the Computer Management tool. If you disable the ability of the usbstor.sys driver to run on the computer, you will in fact block the computer's means of discovering the flash drive and loading the appropriate driver.
Note that this will only prevent usage of newly plugged-in USB Removable Drives or flash drives, devices that were plugged-in while this option was not configured will continue to function normally. Also, devices that use the same device or hardware ID (for example - 2 identical flash drives made by the same manufacturer) will still function if one of them was plugged-in prior to the configuration of this setting. In order to successfully block them you will need to make sure no USB Removable Drive is plugged-in while you set this option. Note: This tip will allow you to block usage of USB removable disks, but will continue to allow usage of USB mice, keyboards or any other USB-based device that is NOT a portable disk. You should also read Disable USB Disks with GPO and Disable Writing to USB Disks with GPO. It's worth mentioning that in Windows Vista Microsoft has implemented a much more sophisticated method of controlling USB disks via GPO. If you have Windows Vista client computers in your organization you can use GPO settings edited from one of the Vista machines to control if users will be able to install and use USB disks, plus the ability to control exactly what device can or cannot be used on their machines.
To block your computer's ability to use USB Removable Disks follow these steps:
HKEY_LOCAL_MACHINE\SYSTEM\CurrentControlSet\Services\USBSTORStart and give it a value of 4. Note: As always, before making changes to your registry you should always make sure you have a valid backup. In cases where you're supposed to delete or modify keys or values from the registry it is possible to first export that key or value(s) to a .REG file before performing the changes.
To return to the default configuration and enable your computer's ability to use USB Removable Disks follow these steps:
Start and give it a value of 3. You can download a .REG file that configure this setting right HERE (1kb).
In a previous article - Understanding Administrative Templates in GPO - I've described the purpose of the Administrative Templates section in the Windows 2000/XP/2003 GPO. Administrative Templates are a large repository of registry-based changes that can be found in any GPO on Windows 2000, Windows XP, and Windows Server 2003. The Administrative Templates are Unicode-formatted text files with the extension .ADM and are used to create the Administrative Templates portion of the user interface for the GPO Editor.
Although Administrative Templates have virtually hundreds of options within them, there may be times when an administrator will need to add more options to a new or existing GPO.
One method for an administrator to add such extensions to the GPO is by adding new settings to the Administrative Templates sections. This can be done by adding .ADM files to the existing Administrative Templates section in GPO.
In order to add additional .ADM files to the existing Administrative Templates section in GPO please follow the next steps:
Note: GPMC is not a built-in part of Windows 2000/XP/2003, and needs to be separately installed. You can download GPMC from the following link (Download GPMC), yet remember it can only be used effectively on Windows Server 2003-based Active Directory.
If you do not have GPMC or cannot install it then you'll need to edit the GPO via the regular means, i.e. from Active Directory Users and Computers management tool (dsa.msc).


Now re-open the Administrative Templates section and browse to the new settings location.
Many custom Administrative Templates require you to remove the requirement to show policy settings that can be fully managed in the GPO editor. To do so follow the next steps:
Note that the section is indeed listed, however in the right-pane is empty.


When adding new .ADM files to any GPO you actually place new features in the Administrative Templates section for that GPO. These settings should be accessible from any DC, and should apply to any computer that is affected by that GPO.
However, if the .ADM files were added, for example, when sitting on DC1, how do you make sure they are also replicated to DC2, DC3 and so on?
Well, luckily for us, in most cases there are no additional configuration steps involved. When adding the new .ADM file it is automatically uploaded to the following location on the DC that was used to edit the GPO (usually - the PDC Emulator, read more in the Understanding FSMO Roles in Active Directory article):
%SystemRoot%\SYSVOL\sysvol\domain name\Policies\{GPO GUID}\Adm
as seen clearly in the following screenshot:

Because all of the SYSVOL folder is shared and automatically replicated all over the domain, the uploaded .ADM file will automatically replicated to all the GPO instances on all DCs in the domain.
However this might cause a problem when using too many templates and too many GPOs, especially on slow WAN links.
In Windows Server 2003, the size of the Administrative Templates has grown when compared to the same .ADM files in Windows 2000. As a result, the entire set of Administrative Templates has grown to almost 1.75MB. When you multiply this size by each Policy that SYSVOL contains, you can see that much space is devoted to these templates.
For example, for a large corporation with 1200 GPOs in place, the entire SYSVOL folder (where the GPOs are located on each DC) can take up more than 1GB of hard disk space. Replicating such a folder over the WAN (especially when promoting a new DC) can be very problematic. Here is where the following article - Install DC from Media in Windows Server 2003 - comes in very handy.
Whenever you do not need the added feature anymore you can simply reverse the process and instead of adding new .ADM files - removing them.
Before removing an Administrative Template, make sure you modify its policy settings and wait for Group Policy to refresh on all the computers that were supposed to be effected by the GPO. This is because removing an Administrative Template that was previously installed does not change or remove any Registry settings that the GPO deployed when Group Policy was last processed.
You should also read KB 813338 for more info on removing .ADM files from GPOs.
Create Custom Administrative Templates in Windows 2000 - 323639![]()
Group Policy Template Behavior in Windows Server 2003 - 316977![]()
How to minimize SYSVOL size by removing administrative templates (.adm files) - 813338![]()
I have seen this question several times at different message boards, so I've decided to write an article about it.
USB removable disks (also known as flash drives or "Disk on Key" and other variations) are quickly becoming an integral part of our electronic life, and now nearly everybody owns one device or another, in forms of small disks, external hard drives that come enclosed in cases, card readers, cameras, mobile phones, portable media players and more.
Portable USB flash drives are indeed very handy, but they can also be used to upload malicious code to your computer (either deliberately or by accident), or to copy confidential information from your computer and take it away.
As a variation to Disable USB Disks, you can prevent users from using any portable USB removable disk or flash drive by using a custom .ADM file that can be imported into the Local Group Policy (thus effecting only the local computer) or by using Active Directory-based Group Policy Objects (also known as GPOs).
Follow the steps outlined in the Adding New Administrative Templates to a GPO article on general instructions on how to add or remove an .ADM file from the Administrative Templates section in GPO.
Note: This tip will allow you to block usage of USB removable disks, but will continue to allow usage of USB mice, keyboards or any other USB-based device that is NOT a portable disk.
It's worth mentioning that in Windows Vista Microsoft has implemented a much more sophisticated method of controlling USB disks via GPO. If you have Windows Vista client computers in your organization you can use GPO settings edited from one of the Vista machines to control if users will be able to install and use USB disks, plus the ability to control exactly what device can or cannot be used on their machines.
Needless to say, as with any GPO setting, this option will only work on Windows 2000 operating systems or higher.
In KB 555324 written by fellow MVP Simon Geary he has provided a nice sample .ADM file that can do just that, and also added other removable storage media to it. You can effectively block usage of any drives containing removable media, such as USB ports, CD-ROM drives, Floppy Disk drives and high capacity LS-120 floppy drives.
However, the original .ADM was pretty simple, so I added a must-have explanation and changed some of the wording in it. By using the file provided below you will also be able to understand the exact settings and scenarios in which the blocking will or will not be successful.
Download the USB_removable_drives_ADM file (2kb)
After downloading the .ADM file, read Adding New Administrative Templates to a GPO.
You might also be interested in reading Disable Writing to USB Disks with GPO.
Note: In order to successfully view and configure the new .ADM file settings you will need to change the default filtering view for the GPO Editor (or GPedit.msc). Unless you change these settings, the right pane will appear empty, even though it has the settings in it.
Follow these steps:


An additional step that needs to be performed before the above tip will work has to do with modifying the file access permissions for 2 files. You need to remove the SYSTEM access permissions from the usbstor.sys and usbstor.inf files.
You can do so by right clicking these files > Properties, then going to the Security tab. There you need to remove the line for the SYSTEM account.

Note: Under some circumstances, the SYSTEM should have write access to these files during Service Pack installation. For example, when the SP is installed via GPO or SMS, the installation runs under the SYSTEM Account.
Service Pack needs to replace the files to a new version and without proper write access to the file, installation will fail... Therefore, before each SP deployment we need to allow access to the SYSTEM account for these files.
When using roaming profiles we must understand that a lot of file copying is performed when logging on to and logging off from the workstation. For example, a user can have thousands of little cookie files on his or her user profile, and when copies to and from the profile's location to the user's workstation, they can really slow down your logon. That is why it’s good to redirect cookies to the user’s home folder, because it stops lots of files from being copied every time you logon into a new computer.
Favorites are more secure on home folder if you ever need to delete the user profile, and more easy to access, and backup.
Both redirections can be done via GPO using a custom ADM file, which I found on the Internet. When properly used, this GPO tattoos the registry and will not revert back when removed, so if you have to change the settings back, you will need to logon and only then it will revert back.

CLASS USER

CATEGORY !!WindowsComponents

CATEGORY !!InternetExplorer

CATEGORY !!IE_Favorites

KEYNAME "Software\Microsoft\Windows\CurrentVersion\Explorer\User Shell Folders"

POLICY !!IE_Favorites

#if version >= 4

SUPPORTED !!SUPPORTED_IE5

#endif

EXPLAIN !!IE_Favorites_Location_Explain

PART !!IE_Favorites_Location_Tip1 TEXT

END PART

PART !!IE_Favorites_Location EDITTEXT EXPANDABLETEXT

VALUENAME Favorites

DEFAULT %USERPROFILE%\Favorites

;; MAXLEN 120

REQUIRED

END PART

END POLICY

POLICY "Redirect Cookies"

PART "Cookies Folder" EDITTEXT REQUIRED EXPANDABLETEXT

DEFAULT "%USERPROFILE%\Cookies"

VALUENAME "Cookies"

END PART

END POLICY

END CATEGORY ;; IE_Favorites

END CATEGORY ;; Internet Explorer

END CATEGORY ;; WindowsComponents

[strings]

WindowsComponents="Windows Components"

IE_Favorites="Location of Internet Explorer Favorites"

IE_Favorites_Location="The path to the favorites folder"

IE_Favorites_Location_Explain="Specify the path to the location of favorites. You can use variables like %USERPROFILE%, %USERNAME%, etc... Both local and UNC path are valid."

IE_Favorites_Location_Tip1="Specify the UNC path to the favorites location"

InternetExplorer="Internet Explorer"

SUPPORTED_IE5="at least Internet Explorer v5.01"


Note: If you ever need to change it back to what it used to be then use %USERPROFILE%\Favorites or %USERPROFILE%\Cookies, as needed.
Tip: Notice that now the cookies and favorites won’t stay with you if you are not connected to the network with a laptop for example, you may consider enabling usage of offline files for that folder.
Please note that by using the above tip, the context of Favorites or Cookies will NOT be automatically moved to the new location. You should either manually copy these files to the network location, or use a logon script to do it. Also cookies and favorites will stay on the server side profile and will be copied every time so you won’t benefit from quick logon until you move or delete them, so make sure your script also deletes them from the old place. Use Windows Explorer on the server and delete them. The cookies will be re created as the user uses the Internet.
However, the greatest risk in setting the end users as local administrators is information security. Here is a little scenario that demonstrates how easy it is to get hold of sensitive information when users are set as local administrators:
Imagine yourself an employee that was "planned" in your organization by a business competitor and was assigned the task of retrieving documents and Emails which belongs to the CFO. This employee has been accepted to work in a legitimate way and was given a user account and a workstation on which he is defined as local administrator.
Now, this employee performs the following simple tasks:
At this point, all he has to do is create some sort of problem in his workstation, open a support call, shut down the computer and go home.
Once the technician arrives to the workstation, he will log on using his account (which is probably defined as Administrator on all workstations). The key-logger will log his password and now our dear spy has Administrator privileges on all workstations in the organization.
From now on, the malicious user can install a key logger on any workstation he wants and retrieve the credentials of almost every user in the organization.
As you can see, there is no need for some master hacker that will break through your firewalls in order to perform this simple task.
The obvious cure to that weakness is to remove end users from the local Administrators group. It does sound pretty simple, but once you've done that you will discover that it is quite a challenge.
The most likely problems that will happen once you remove the users from the Administrators group are applications that stop function properly, login scripts that suddenly fail and angry users that will give you thousands of excuses why they must have administrative privileges.
Regarding the angry users, the solution is quite simple. Let the IT manager read the first part of this article and he will make sure he is backed up from the upper management.
Regarding the legacy applications that all of a sudden stop function properly, you can take the longest run, the long run and the easy way.
The most proper way to deal with the described situation is to have the relevant software vendors upgrade their products and make them function properly for non-privileged users. However, this task can take a very long time to accomplish and might cost a great deal of money to the organization.
The most common way to overcome the described issue is to find exactly which permissions are required by the legacy applications (you can do it by using Microsoft's PROCMON - download). This process is quite frustrating and you'll probably find yourself spending long days on finding the exact permissions required. After you've done that, you would have to define it through Group Policy Security Settings and distribute the settings to users. Anyhow, assigning these privileges to end users might make those users too 'Strong'; allowing them to do stuff you wouldn't want them to do!
MS Windows supports manual execution of processes using an alternative set of credentials. This means that you can take users out of the local Administrators group, let them log in to windows using their non-privileged account and then execute a specific application (or command) using a separate, privileged account. This can be done by right clicking a desktop shortcut and choosing 'Run As…'
You can also use the command line interface 'RunAs'. However, this is not very useful since you have to provide the password of the privileged user to all users (which takes you right back to square one…). If you are a bit more sophisticated, you can use the RunAs command to save the credentials of a privileged user, and then create a shortcut for the users that does not require them to enter the password.
This sounds like the perfect solution, BUT it does have some major disadvantages: First, there is no secure way to distribute the password to all users, meaning that you will have to enter the password yourself for each user (not very practical). Second, once you entered the password for each user, you pretty much stuck with this password and you probably won't be able to change it in the future.
Luckily for us, there are several tools that help us dealing with this situation. Some of the tools are simple CLI utilities that can pipe the password (but you would still have to expose it). Other tools are more advanced and allow you to create encrypted credentials file and use this file to execute the relevant software.
The most feature-rich tool available is a freeware tool I have recently come across called "RunAsGUI" by Smart-X (www.smart-x.com)
RunAsGUI comes with a very intuitive wizard-like configuration form that walks you through the steps of setting the encrypted configuration file and creating a desktop shortcut that would run a specific application with a specific user account.
Using RunAsGUI you can store the credentials of a domain or local account which is configured as Administrator in encrypted credentials file and store this file on the network.
In order to support laptop computers which are sometime used offline, RunAsGUI has a build-in cache mechanism that caches the credentials and uses them when the machine is offline. This allows you to easily change the privileged account's password at any time.
Another nice feature is creating a desktop shortcut for an application which once launched the user is prompted to enter alternative credentials. This is most useful in domain migration situations when users might have two accounts for a temporary period of time.

You can also use RunAsGUI to run scripts using a privileged account. RunAsGUI allows you to execute processes in a synchronic or a-synchronic manner, define a timeout and let you choose what to do when the timeout elapses. Using this feature you can easily execute specific commands through login script and make sure they don't take too much time to run when the machine is offline.

On the client side, you can choose to install the client-side RunAsGUI locally on each workstation or simply execute it through a network share without any installation on the client side.
You can download RunAsGUI HERE.
Fortunately, there is a way that you can backup your group policy settings separately from the rest of the Active Directory. Of course you have to do this before the need to restore your group policy settings arises.
Backing Up the Group Policy Objects
Begin the process by logging on to a Windows Server 2008 domain controller, and opening the Group Policy Management console. Now, navigate through the console tree to Group Policy Management | Forest:
Figure A
The Group Policy Objects container stores all of the group policy objects for the domain.
Now, right-click on the Group Policy Objects container, and choose the Back Up All command from the shortcut menu. When you do, Windows will open the Back Up Group Policy Object dialog box. As you can see in Figure B, this dialog box requires you to provide the path to which you want to store the backup files. You can either store the backups in a dedicated folder on a local drive, or you can place them in a folder on a mapped network drive. The dialog box also contains a Description field that you can use to provide a description of the backup that you are creating.
Figure B
You must provide the path to which you want to store your backup of the group policy objects.
Backing Up Individual Group Policy Objects
In case you're wondering, Windows Server 2008 does allow you to backup individual group policy objects. The process for doing so is very similar to what I just showed you. The difference is that when you select the Group Policy Objects container, shown in Figure A, you would right-click on an individual Group Policy Object rather than on the Group Policy Objects container. From there, you would choose the Back Up command from the shortcut menu. The rest of the process is identical to what you have already seen.
The Anatomy Of The Back Up
When you create a backup, Windows creates individual folders within the target folder. Each of these individual folders bears the GUID of the Group Policy Object that contains. This is true whether you are backing up an individual Group Policy Object, or all of the Group Policy Objects in the entire domain. You can see what the backup folder looks like in Figure C.
Figure C
Windows creates a separate folder for each Group Policy Object.
The Restoration Process
When it comes to restoring a backup of any Group Policy Object, you have two options. The first option is to right-click on the Group Policy Object, and choose the Restore From Backup command from the shortcut menu. When you do this, Windows will remove all of the individual settings from the Group Policy Object, and then implement the settings found in the backup.
Your other option is to right-click on the Group Policy Object you want to restore, and choose the Import Settings option. This option works more like a merge than a restore. Any settings that presently reside within the Group Policy Object are retained unless there is a contradictory settings within the file that is being imported.
Conclusion
As you can see, it is pretty simple to backup your Group Policy Objects. Even so, a lot of administrators do not realize the importance of backing up group policy objects separate from backing up the Active Directory.
In Windows Vista and Windows Server 2008, the Task Manager has been beefed up to show additional information about the system. One of these pieces of info is the server’s running time.
1. Right-click on the Taskbar, and click Task Manager. You can also click CTRL+SHIFT+ESC to get to the Task Manager.
2. In Task Manager, select the Performance tab.
3. The current system uptime is shown under System.

Probably one of the easiest methods to accomplish this task. The Systeminfo command line utility checks and displays various system statistics such as installation date, installed hotfixes and more.
Open a Command Prompt and type the following command:
systeminfo
You can also narrow down the results to just the line you need:
systeminfo | find "System Boot Time:"

Microsoft have published a tool called Uptime.exe. It is a simple command line tool that analyzes the computer's reliability and availability information. It can work locally or remotely. In its simple form, the tool will display the current system uptime. An advanced option allows you to access more detailed information such as shutdown, reboots, operating system crashes, and Service Pack installation.
Read the following KB for more info and for the download links:
Uptime.exe Tool Allows You to Estimate Server Availability with Windows NT 4.0 SP4 or Higher
http://support.microsoft.com/kb/232243
To use it, follow these steps:
1. Download uptime.exe from the above link, and save it to a folder, preferably in one that's in the system's path (such as SYSTEM32).
2. Open an elevated Command Prompt window. To open an elevated Command Prompt, click Start, click All Programs, click Accessories, right-click Command Prompt, and then click Run as administrator. You can also type CMD in the search box of the Start menu, and when you see the Command Prompt icon click on it to select it, hold CTRL+SHIFT and press ENTER.
3. Navigate to where you've placed the uptime.exe utility.
4. Run the uptime.exe utility. You can add a /? to the command in order to get more options.
uptime.exe

Another easy method, if you can remember it, is to use the approximate information found in the statistics displayed by the NET STATISTICS command.
Open a Command Prompt and type the following command:
net statistics workstation
The statistics should tell you how long it’s been running, although in some cases this information is not as accurate as other methods.

Probably the most accurate of them all, but it does require some clicking. It does not display an exact day or hour count since the last reboot, but it will display important information regarding why the computer was rebooted and when it did so. We need to look at Event ID 6005, which is an event that tells us that the computer has just finished booting, but you should be aware of the fact that there are virtually hundreds if not thousands of other event types that you could potentially learn from.Note: BTW, the 6006 Event ID is what tells us when the server has gone down, so if there’s much time difference between the 6006 and 6005 events, the server was down for a long time.
1. Open Server Manager tool by right-clicking the Computer icon on the start menu (or on the Desktop if you have it enabled) and select Manage. Navigate to the Event Viewer.
Note: You can also open the Event Viewer by typing eventvwr.msc in the Run command, and you might as well use the shortcut found in the Administrative tools folder.
2. Click on Event Viewer (Local) in the left navigation pane.
3. In the middle pane, click on the Information event type, and scroll down till you see Event ID 6005. Double-click the 6005 Event ID, or right-click it and select View All Instances of This Event.
4. A list of all instances of the 6005 Event ID will be displayed. You can examine this list, look at the dates and times of each reboot event, and so on.

Note: You can also easily create a Custom View to find all 6005 events. Please read my “Working with Filtering and Custom Views in the Vista Event Viewer” article for more information.
I will use the System Log and 6005 Event ID as the parameters for the custom view, and bingo, we can see all recent reboots of the system.


I found this nice article by the Microsoft Scripting Guy (read article for more details). I've changed the original suggestion a bit to make it more readable. Copy the following text into a text file and save it with a VBS extension. When done, double click on the file to get the system’s running time in minutes.
strComputer = "."

Set objWMIService = GetObject("winmgmts:\" & strComputer & "rootcimv2")
Set colOperatingSystems = objWMIService.ExecQuery _
  ("Select * From Win32_PerfFormattedData_PerfOS_System")

For Each objOS in colOperatingSystems
  intSystemUptime = Int(objOS.SystemUpTime / 60)
  strMessage = "System uptime is "  & intSystemUptime & " minutes"
 msgBox strMessage, 0, "System Uptime"
Next
Hey, Scripting Guy! How Can I Determine the Uptime for a Server?:
http://www.microsoft.com/technet/scriptcenter/resources/qanda/aug05/hey0802.mspx
I found this interesting article by the Microsoft Scripting guys. The logic and explanations are too long for me to include here. Read it for more information.
Use PowerShell and WMI to calculate server uptime:
http://technet.microsoft.com/en-us/magazine/2008.12.heyscriptingguy.aspx?pr=blog
Sometimes you might need to retrieve the CD Key used to install Windows in order to find out if it's legally purchased, or just for safe keeping. I usually find myself in that position whenever I'm at a client's location, trying to see if the copy of Windows 2000 he's using is indeed legally registered.
Luckily for us, some programs exist that can help you do just that - retrieve license information from the registry, and allow you to copy it for safekeeping or for documentation purposes.
Magical Jelly Bean Keyfinder
This is a small freeware utility that retrieves your Product Key (cd key) used to install windows from your registry. It has the options to copy the key to clipboard, save it to a text file, or print it for safekeeping. It works on Windows 95, 98, ME, NT4, 2000, XP, Server 2003, Office 97, and Office XP.
This version (v1.41) is a quick update to make it work with Windows Server 2003.

You can download it (kf141.zip, 251kb) or visit the author's website.
Note: This tool does not seem to be able retrieve the Office 2003 CD Key. However, a new version of this tool - v1.5B3 - does have the capability of seeing the Office 2003 CD Key, and also enables you to directly change the existing CD Key to another one.
Note that this tool is NOT a cracking tool, and it does NOT generate a serial for you. All it does is to extract your existing CD Key.
CD Key Reader
CD Key Reader is another small tool that can find and display registration information for Microsoft tools and software that is installed on your computer (i.e. Windows, Office and so on).

You can download it from the author's website (43kb):
BTW, there are quite a few other tools that do the same trick. If you know of a good one please let me know and I'll update this page ![]() .
.