How to Decode a Tire Identification Number to Determine Tire Age

Thursday, September 3, 2009

How to Decode a Tire Identification Number to Determine Tire Age

Picture (Device Independent Bitmap)

This tire was manufactured during the 27th week of 2008. (click on the image to enlarge)

Tire age is the most important factor to consider when buying new or used tires. Just because a tire is brand new does not ensure that it is safe to use on a vehicle. As tires age the rubber breaks down and begins to crack, which can result in devastating car wrecks. For optimum safety, do not buy tires manufactured more than six years ago, learn to decode tire identification numbers, and always determine tire age before you buy new tires.

Difficulty: Easy

Instructions

1.      Step 1

    Look for the Tire Identification Number branded on the sidewall of the tire to determine the tires age. The Tire Identification Number is preceded by DOT, which stands for Department of Transportation, and is 10 to 12 digits in length. You may have to check both sides of the tire to find the complete Tire Identification Number.

2.      Step 2

    Locate the last three or four digits of the Tire Identification Number. Previous to 2000, three digits determined the tire age. Tires made since 2000 use four numbers to determine a tires age.

3.      Step 3

    Since 2000

    Determine the year the tire was manufactured by decoding the last two digits. For example, if the last two digits are “07”, then the tire was manufactured in 2007.

4.      Step 4

    Determine the week the tire was manufactured by decoding the first two numbers that makeup the last four digits in the Tire Identification Number. For example, if the last four digits of the Tire Identification Number are 2807, then the tire was manufactured during the 28th week of 2007.

5.      Step 5

    Before 2000

    Determine the year the tire was manufactured by decoding the last digit of the Tire Identification Number. For example, if the last digit is “3”, then the tire was manufactured during the 3rd year of the decade. The problem with this system was that you could not determine during which decade the tire was made.

6.      Step 6

    Determine the week the tire was manufactured by decoding the first two numbers that makeup the last three digits in the Tire Identification Number. For example, if the last three digits of the Tire Identification Number are 403, then the tire was manufactured during the 40th week of 1993 (or 1983).

7.      Step 7

    Shop for newly manufactured tires by decoding the Tire Identification Numbers. A good rule of thumb is to purchase tires that are less than six years old for optimum safety.

Please do not print this email unless it is absolutely necessary.

The information contained in this electronic message and any attachments to this message are intended for the exclusive use of the addressee(s) and may contain proprietary, confidential or privileged information. If you are not the intended recipient, you should not disseminate, distribute or copy this e-mail. Please notify the sender immediately and destroy all copies of this message and any attachments.

WARNING: Computer viruses can be transmitted via email. The recipient should check this email and any attachments for the presence of viruses. The company accepts no liability for any damage caused by any virus transmitted by this email.

www.wipro.com

READ MORE - How to Decode a Tire Identification Number to Determine Tire Age

How To Know When to Buy New Tires

How To Know When to Buy New Tires

Picture (Device Independent Bitmap)

Maintaining your tires is an important aspect of vehicle ownership, and knowing when to buy new tires can be difficult. By learning how to assess the condition of your tires, you will reduce the risk of blowouts, hydroplaning and decreased traction when you are on the road.

Difficulty: Easy

Instructions

1.      Step 1

    Examine the tire walls of each tire. They should be free from cracks, bulges and other signs of damage. If the tire wall shows signs of damage, replace the tire or tires immediately. Otherwise, they could blow out while you are driving, posing a safety hazard to you and other drivers.

2.      Step 2

    Check all surfaces of each tire for uneven wear. Move the car to check areas that are in contact with the ground for a thorough inspection.

3.      Step 3

    Check your tread depth. If you are unsure whether you have enough tread, use a quarter to measure the tread depth. Place the quarter in the tread with George Washington's head upside-down in 3 different locations. Check 1 inch from the inside of the tire, 1 inch from the outside and in the middle of the tread. If all of Washington's head is visible from any of these checkpoints, it is time to replace your tires.

4.      Step 4

    Check the treadwear bars that run horizontally across the tire, even if your tires pass the quarter test. If the treadwear bars are flat with surface of your tire, replace your tires.

5.      Step 5

    Check your air pressure regularly. If your tires are not maintaining pressure, there is a slow leak in the tire and it needs to be replaced.

6.      Step 6

    Buy new tires if your existing ones have been punctured. Some punctures can be repaired with a patch, but in some cases replacement may be a better option.

Please do not print this email unless it is absolutely necessary.

The information contained in this electronic message and any attachments to this message are intended for the exclusive use of the addressee(s) and may contain proprietary, confidential or privileged information. If you are not the intended recipient, you should not disseminate, distribute or copy this e-mail. Please notify the sender immediately and destroy all copies of this message and any attachments.

WARNING: Computer viruses can be transmitted via email. The recipient should check this email and any attachments for the presence of viruses. The company accepts no liability for any damage caused by any virus transmitted by this email.

www.wipro.com

READ MORE - How To Know When to Buy New Tires

Related Posts with Thumbnails for Blogger

Related Posts with Thumbnails for Blogger

Related Posts with Thumbnails for Blogger

Displaying the links to related posts along with a thumbnail of the corresponding post will help you increase the page views/user .Users will be tempted to go for the related posts when they are presented attractively with thumbnails.

This is another first release from me.This one also uses the media thumbnails generated by blogger for each post.

For displaying the thumbnails,this widget will use the images uploaded for the post using the blogger image uploader(from the post editor)

Related Posts Widget with Thumbnails for Blogger

Here are the detailed installation steps

1.First of all Login to your blogger dashboard and navigate to Layout > Edit HTML

2.Now look for

</head>

and replace it with

<!--Related Posts with thumbnails Scripts and Styles Start-->

<b:if cond='data:blog.pageType == &quot;item&quot;'>

<style type="text/css">

#related-posts {

float:center;

text-transform:none;

height:100%;

min-height:100%;

padding-top:5px;

padding-left:5px;

}


#related-posts h2{

font-size: 1.6em;

font-weight: bold;

color: black;

font-family: Georgia, &#8220;Times New Roman&#8221;, Times, serif;

margin-bottom: 0.75em;

margin-top: 0em;

padding-top: 0em;

}

#related-posts a{

color:black;

}

#related-posts a:hover{

color:black;

}


#related-posts  a:hover {

background-color:#d4eaf2;

}

</style>

<script src='http://blogergadgets.googlecode.com/files/relatedthumbs19.js' type='text/javascript'/>

</b:if>

<!--Related Posts with thumbnails Scripts and Styles End-->

</head>

3.Now Find

<div class='post-footer-line post-footer-line-1'>

If you cant find it then try finding this one

<p class='post-footer-line post-footer-line-1'>

Now immediately after any of these lines(whichever you could find) place this code snippet

<!-- Related Posts with Thumbnails Code Start-->

<b:if cond='data:blog.pageType == &quot;item&quot;'>

<div id='related-posts'>

<b:loop values='data:post.labels' var='label'>

<b:if cond='data:label.isLast != &quot;true&quot;'>

</b:if>

<b:if cond='data:blog.pageType == &quot;item&quot;'>

<script expr:src='&quot;/feeds/posts/default/-/&quot; + data:label.name + &quot;?alt=json-in-script&amp;callback=related_results_labels_thumbs&amp;max-results=6&quot;' type='text/javascript'/></b:if></b:loop><a href='http://www.bloggerplugins.org/2009/08/related-posts-thumbnails-blogger-widget.html' style='display:none;'>Related Posts with thumbnails for blogger</a><a href='http://www.bloggerplugins.org/' style='display:none;'>blogger widgets</a>

<script type='text/javascript'>

var currentposturl=&quot;<data:post.url/>&quot;;

var maxresults=5;

var relatedpoststitle="Related Posts";

removeRelatedDuplicates_thumbs();

printRelatedLabels_thumbs();

</script>

</div><div style='clear:both'/>

</b:if>

<!-- Related Posts with Thumbnails Code End-->

4.You can adjust the maximum number of related posts being displayed by editing this line in the code.

var maxresults=5;

5.To edit the title of the widget you can change this line of code

var relatedpoststitle="Related Posts";

To change the colors and all you will have to modify the CSS

If you fall into troubles implementing this,don't panic.. :) .just leave me a comment here and i will help you out. If you like to give me any suggestions on how to improve this widget,then it would be really great.

If you need a demo just check the related post thumbnails below this post. If you liked this widget,please do retweet and spread the news. :).
UPDATE: Fixed the chrome Issue.So if you installed the widget before seeing this,then please update the widget.. :)


Please do not print this email unless it is absolutely necessary.

The information contained in this electronic message and any attachments to this message are intended for the exclusive use of the addressee(s) and may contain proprietary, confidential or privileged information. If you are not the intended recipient, you should not disseminate, distribute or copy this e-mail. Please notify the sender immediately and destroy all copies of this message and any attachments.

WARNING: Computer viruses can be transmitted via email. The recipient should check this email and any attachments for the presence of viruses. The company accepts no liability for any damage caused by any virus transmitted by this email.

www.wipro.com
READ MORE - Related Posts with Thumbnails for Blogger

How to Take an Unforgettable Labor Day Vacation

How to Take an Unforgettable Labor Day Vacation

Picture (Device Independent Bitmap)

Trying a thrilling new experience will create vivid memories.

A truly great vacation can be savored not only during the journey, but reflected on for years to come with a wealth of happy memories. Here are some tips for making sure your Labor Day getaway doesn’t get lost in the shuffle of your travel reminiscences.

Difficulty: Moderately Easy

Instructions

Things You'll Need:

·       A sense of adventure!

1.      Step 1

    Choose a dramatically different locale than usual for your destination. If you’re normally a beach bum, try a trip to the mountains, and vice versa. You can always return to your travel "comfort zone" on your next vacation if you don’t like the new experience, but life’s too short to skip new experiences.

2.      Step 2

    Along these lines, consider a place you’ve always wanted to visit but haven’t been able to, or a place that you loved as a child but haven’t been for many years. Either of these choices will be more memorable than returning to your old favorite once again.

3.      Step 3

    Travel with someone you’ve never journeyed with before. Yes, this can be risky, as not everyone can travel together with complete compatibility, but it’s sure to make the trip more memorable.

4.      Step 4

    Skip the chain lodgings and restaurants and support family-owned and indie businesses. There definitely can be something comforting and reliable about brand-name hotels and eateries, but the downside is that they’re all fairly similar—and generally forgettable for the most part.

5.      Step 5

    Experience something new and exciting you’ve always thought about but never tried. Go skydiving, take a hot air balloon ride, try bungie jumping, visit a dude ranch—whatever your long-anticipated dream adventure may be.

6.      Step 6

    Buy something unusual as a souvenir, which will serve as a permanent reminder of your unique vacation. It’s hard to forget a trip if you have, for example, a shrunken head or stuffed and mounted swordfish on the fireplace mantle serving as a daily reminder of it.

7.      Step 7

    Camera buffs should consider a different approach for just one trip, picking a theme for the journey rather than just snapping away at the dramatic landscapes, as per usual. What about focusing on something specific, such as architecture, local citizens or wildlife?

8.      Step 8

    Since it is Labor Day after all, why not experience a "labor of love" by volunteering for something you strongly believe in on your trip? Planting trees, cleaning up a shoreline, even helping out at a food bank, can be remarkably rewarding and extremely meaningful—and also quite memorable.

Please do not print this email unless it is absolutely necessary.

The information contained in this electronic message and any attachments to this message are intended for the exclusive use of the addressee(s) and may contain proprietary, confidential or privileged information. If you are not the intended recipient, you should not disseminate, distribute or copy this e-mail. Please notify the sender immediately and destroy all copies of this message and any attachments.

WARNING: Computer viruses can be transmitted via email. The recipient should check this email and any attachments for the presence of viruses. The company accepts no liability for any damage caused by any virus transmitted by this email.

www.wipro.com

READ MORE - How to Take an Unforgettable Labor Day Vacation

How do I use a custom domain name on my blog?


How do I use a custom domain name on my blog?


Note: The setup process for newly-purchased domains may take up to 24 hours.


Publishing on Blog*Spot is the fastest and easiest way to use all of Blogger's great features. (And for free, no less!) If you don't care to have blogspot.com in your blog's address, though, you can get a domain of your own. We'll continue to host all your content as before, but it will be displayed at your new address. (Unlike FTP publishing, which requires you to buy both a domain name and a hosting service.)


Choose and Register Your Domain


The first thing you'll need to do is to choose a domain name, like example.com and register it. You can register domain names from any of a number of different registrars, and you can use .com, .org, .net or any other valid addresses. Remember: you only need to get the domain name; you don't have to pay extra for hosting service. The easiest way to register a domain is to buy your domain directly through Blogger. If you go this route, we'll automatically configure all of your relevant DNS settings and attach your new domain to your existing blog immediately.


Update the DNS Settings


DNS stands for Domain Name System, and a DNS server determines what site a given address takes you to. So far, you have a domain name but none of the servers on the internet know what to do with it yet. To take care of this, you need to do two things:


  • Create a CNAME record for your blog's address, which should be a subdomain of the form www.example.com.


    To create a CNAME record for your domain with the DNS, associating your domain with ghs.google.com. The exact procedure for doing this varies depending on your domain registrar, but you can find instructions for many common registrars here. If yours isn't listed, or if you run into other difficulties, you can contact your registrar directly and they'll be able to help you out.


  • Create 'A' NAME records for your naked domain (blog.com)


    Creating A records for your naked domain is important as it allows Google to redirect people who use in your naked domain name (blog.com) to your blog page (www.example.com). If you do not do this, visitors who leave off the www will see an error page.


    There are four separate A records you will create, and can be done from the same control panel you accessed your CNAME records. Simply point your naked domain (example.com, without the 'www') to each of the following IP addresses:


216.239.32.21
216.239.34.21
216.239.36.21
216.239.38.21


Your DNS setup is now complete!


Update Your Blogger Settings


Almost done! At this point, you have a domain name, and the DNS servers know to direct people to Google when they want to see your blog. But Google hosts lots of blogs, so we have to make sure the right one is associated with this domain. You'll do this on the Settings Publishing tab for your blog in Blogger.


If you're publishing on Blog*Spot, you'll see a link near the top offering to switch you to a custom domain. Go ahead and click that link.


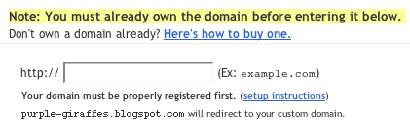
The Blog*Spot Address setting now changes to Your Domain. Fill in the domain you registered, and then save your settings.


Now the only thing left to do is to tell everybody about your new address!


Notes:


READ MORE - How do I use a custom domain name on my blog?


Popular Posts